Automatic Collections enable nonprofits to automate actions based on triggers, so they can reattempt a card upon a failed transaction or email the donor to update their credit card details. An Automatic Collection record gets created when a transaction gets rejected and the same record is closed if and when the transaction for the same amount is successful before the next scheduled donation date.
The Automatic Collections feature allows our merchants to automatically collect failed recurring donations from their donors and reduce the loss of donations. By activating this feature, an unsuccessful recurring donation will go through the automatic collection process in which several actions will take place to secure the payment correctly from the donor.
This feature helps to:
- Recover lost donations
- Reduce involuntary churn of donors
- Reduce administrative cost of securing the donation
- Report on lost donors and revenue faster
In this guide, we will cover:
How Automatic Collections work:
EXAMPLE WORKFLOW:
- An iATS Transaction is received with a status of ‘Reject’.
- A new Automated Collection record is created to track the automatic collection process
- Automatic Collection Stage records are also created which attempt to collect the failed payment
- If a payment is successfully received via the Automatic Collection Stages (or manually), then the Automatic Collection process ends.
EXAMPLE AUTOMATIC COLLECTION STAGES:
- First Stage: Payment Attempt
- Second Stage: Send Email (with link to update payment information)
- Third Stage: End Automatic Collection and Send Email
Prerequisites for Automatic Collections
- Brickwork version 6.38 or newer installed
- Nonprofit Success Pack installed
- Enhanced Recurring Donations enabled on NPSP Settings
- iATS Settings ‘Recurring Payments Model’ set to ‘Recurring Donations and Opportunities (Donations)’
How to Setup Automatic Collections
- Set up an organization-wide email address if one does not exist
2. Create applicable email templates and then add them to the 'iATS Brickwork' classic email template folder or create a lightning email template folder with a label that includes ‘Brickwork’.
3. Add the 'pp' visualforce payment page to the applicable Salesforce Site for display.
4. Update the Salesforce Site guest user profile to have ‘read’ access on the Document object (this allows the payment page logo to be displayed). More details below in the ‘Customize the Payment Page’ section.
Automatic Collections Configuration
Basic steps:
- Enable Automatic Collections
- Create an Email Template
- Set the stages actions and schedule
- Customize the payment page which will be displayed to donors
Detailed steps:
- Enable Automatic Collections
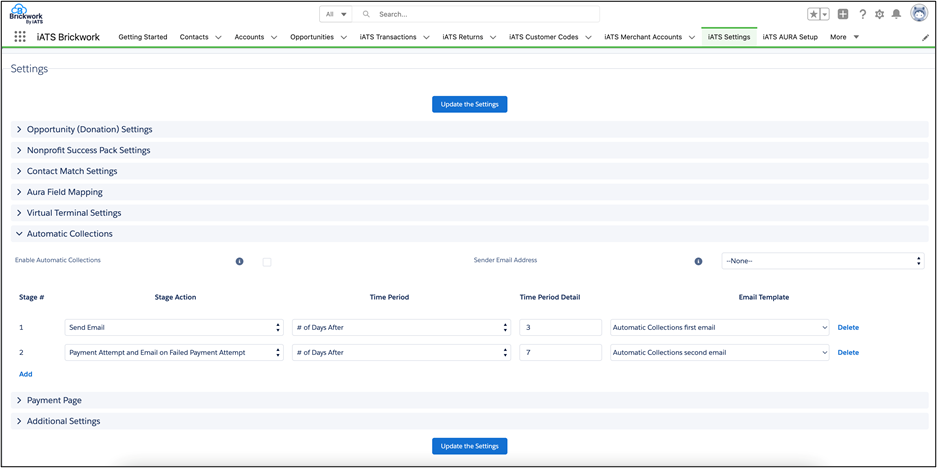
The Automatic Collections process can be enabled from the iATS settings page. There is a new tab for ‘Automatic Collection’ and below it there is check box to enable Automatic Collections. After enabling, select a ‘Sender Email Address’. Once selected, you will now be able to set up stage actions, time periods and email templates.
 2. Create an Email Template
- Create a Lightening email template by searching for ‘Email Templates’ in the App Launcher
- Create a new folder called ‘Brickwork’ to save the email templates in
- Click on ‘New Email Template’, add a name and choose ‘iATS Automatic Collection’ as the related entity. This will enable referencing Related Merge Fields from an Automatic Collections record in the email template
- In the email’s HTML value, insert merge fields as required for the template
3. Set the Stage Actions and Time Periods
Stages are steps that the Automatic Collections process will take to secure the payment. You can have as many stages as you like. For each stage, there are 4 things to consider which are as follows:
Stage Action – First decide on the stage action to take place for the stage. We have 6 stage actions to choose from:
a. Send email – This action sends a pre-selected email to the donor. There are multiple email template options to choose from which are noted further down in this guide.
b. Payment Attempt – The action re-attempts the stored payment method. If the re-attempt is successful in receiving a payment, the Automatic Collection process is set to ‘Completed – Payment Received'. If the re-attempt fails, then the process moves on to the next stage.
c. Payment Attempt and Email on Failed Payment Attempt – This action re-attempts the stored payment method and in case of a failed payment, an email is sent to the donor. You can select any email template that you would like to be sent out. Here is an example email message: “We attempted to process your recurring donation with the card ending in xx2342 but unfortunately the donation failed. Please access the payment page via the following link to update the card”.
d. End Automatic Collections – This action ends the Automatic Collection process by updating the status field to ‘Completed - Unsuccessful’. This is the last stage of the process and will only be reached if no payment is received by a previous stage action.
e. End Automatic Collections and Send Email – This action ends the Automatic Collection process by updating the status field to ‘Completed - Unsuccessful and also sends the email template that is selected.
Time Period – This field determines when to execute the stage action. This is based on the previous stage completion date (or Automatic Collection record creation date if no stages are completed). There are five periods to choose from:
- Immediately – execute action immediately when a donation fails
- # Of Days after – execute the action a number of days after the previous stage is completed
- # Of Weeks after – execute the action a number of weeks after the previous stage is completed
- # Of Months after - execute the action a number of months after the previous stage is completed
- Day of the Week – execute the action on a selected day of the week
- Day of the Month - execute the action on a selected day of the week
Time Period Detail - This field specifies the value for the selected Time Period field. Please see the examples below:
Time Period - # of Days after
Time Period Detail - 3
This notifies the system to execute the action 3 days after the previous stage is completed
Time Period - Day of the Week
Time Period Detail - Monday
This notifies the system to execute the action on the next Monday
4. Customize the Payment Page
- Choose the Salesforce site to display the ‘pp’ visualforce payment page. Please note that site must be active.
- Customize payment page messages
- Upload a logo and adjust the background color of the payment page
- Click the ‘Update the Settings’ button and then select the ‘Payment Page preview’ for review
View and Manage Automatic Collections
Automatic Collection records are viewable via the iATS Automatic Collections tab.
The Automatic Collection record has variety of informative fields such as: Status, Payment Page URL, related iATS Customer Code, Related Failed iATS Transaction, and related merge fields. There is also an activity history related list which notes the emails sent and an Automatic Collection Stages component to quickly view the related stages.- The Automatic Collection process will continue until the Status field is set to ‘Completed’ value.
- If a payment is received by a payment retry attempt or the payment page, the Status, Payment Received Date and Related Approved iATS Transaction fields will also be automatically populated.
- Each Automatic Collections Stage record can be manually edited after creation allowing you to modify the time period or action for example.
- The ‘Related Merge Fields’ section displays related record fields for display in email templates.

.png?width=200&height=150&name=iATS%20by%20Deluxe_200x150%20(1).png "iATS by Deluxe_200x150 (1)")