Aura offers Shopping Cart capabilities which includes up to 20 individual payment levels with the benefit of being able to add two unique options per level. Please note that the Aura Shopping Cart is not compatible with Brickwork at this time.
For example, the cart below has been built to sell a T-Shirt, Baseball Hat, and Tickets to a Gala. The first three payment levels are being utilized, and in the case of the T-Shirt and Gala Ticket items, Options #1 and #2 to offer the end user additional options such as size, color or seating arrangements etc.
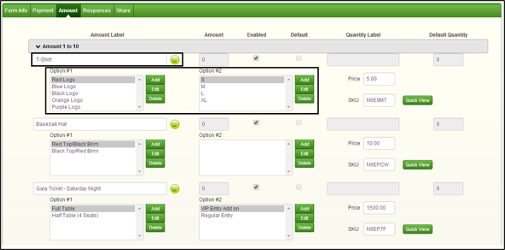
In addition, each item will receive its own unique SKU code to keep track of the different prices and options available for sale. These codes can be changed to reflect existing SKU’s that may already exist within your organization if preferred.
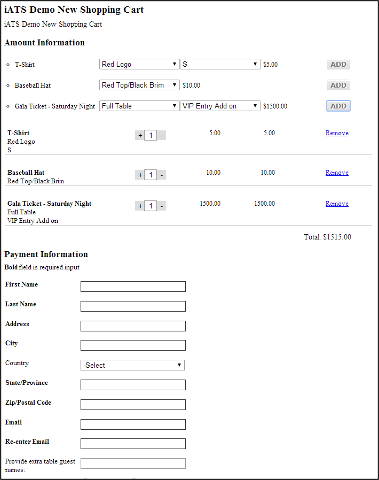
Preview of form with Shopping Cart features enabled (with no CSS style sheet applied):
Please note: Each option has a 200-character limit, however longer labels may require you to expand the Width of the form (field located on Form Info tab), and apply custom CSS styling to adjust the height of each option.
Shopping Cart Reporting
The iATS Portal reports at www.iatspayments.com include details on the Items and Options associated with your shopping cart options. Specifically, the daily and date-span Sales Item.CSV export reports located within the Journal tab can be run for both Credit Card and ACH methods of payment.
For more information regarding the iATS Portal Reporting features, please contact iATS Customer Care.
Steps to create a form with shopping cart features
| 1. | Create an Aura form as per the steps at the top of this guide. The shopping cart features are added via the Amount tab. |
| 2. | On the Amount tab, expand the Amount 1 – 10 section, and add a Label in Level 1, for example TShirt. |
| 3. | Click the shopping cart icon and click the Add button to enter Option #1 details if required. |
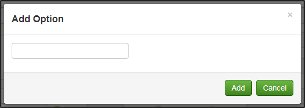
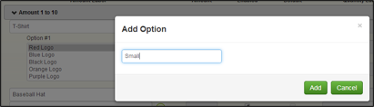
| 4. | Once you have added all Option #1 details, click on the Add button beside the Option #2 area. Please ensure that you have first clicked on the appropriate Option #1 item before adding Option #2. For example: |
| 5. | If no Option #2 is being used, or once Option #2 has been added, click into the Price box (not the Amount box) and add the value of the item. The SKU can be edited if needed at this point. |

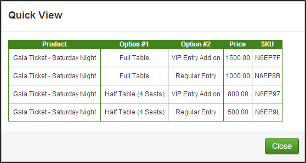
| 6. | To ensure all Options and prices have been added, click the Quick View button. |
| 7. | Remember to click the Save Form button at the top of the page to save your Aura form! |
| 8. | You may also click the Preview button to review the cart options. Note that you may also expand the width of the form by adjusting the Width field, found on the Form Info tab. |

.png?width=200&height=150&name=iATS%20by%20Deluxe_200x150%20(1).png "iATS by Deluxe_200x150 (1)")