Page Builder Setup and Support

Learn how to set up payment pages, change design settings, understand reporting and metrics, and dive into advanced features of Page Builder.

View Transactions

view transactions 750x250

Option 1: Search for an Individual Transaction

  1. Go to Transaction Center > Virtual Terminal
  2. You may enter criteria in any of the fields to narrow down your search OR leave all criteria blank.
  3. Click Begin Search at the bottom of the page
  4. If no criteria are set, the 100 most recent transactions will be displayed. If there is any criteria set, the search will narrow down based on what was entered.
  5. From your search, you will see the following information about the Transaction: CIM Reference Number, whether it was Settled, Credited or Voided, Order ID, Customer Name, Transaction Type, Entry Method, Status, Transaction Date, Account Type, the Last 4 Digits of the Card, and the Amount of the Transaction. If you'd like to view more information for a transaction, click on the magnifying glass icon  next to the transaction. This displays more information about the transaction.

When you view transaction details with the magnifying glass icon, this is the information you will be presented with on that transaction:

  • The date the transaction was ran and also the dates of all other actions related to the transaction
  • Authorization response and Approval Code are bank responses. The authorization response can shed some light on why a transaction might have declined.
  • CVV2 Response and AVS Response are both useful in determining the bank's response as well, as these indicate whether what was entered was a match for the security code on the card and the billing address on file, respectively. View full list of AVS and CVV2 responses by card here.
  • Batch Settlement Number is useful to determine when the transaction went through for settlement and what transactions it was settled with. See here for information about viewing batches.
  • The IP address is the internet address the transaction came from. This is the outside internet address, so this would not be able to tell you which computer on a local network posted a transaction. It can be helpful if there are employees in different locations or if you are trying to determine if a transaction is fraudulent.
  • The Posted By field shows which user on the account ran the transaction. This is useful for determining which users are responsible for which transactions.
  • The MID and TID correspond to the merchant account. This is helpful for accounts that tie in to more than one merchant account.
  • If the transaction was ran on M+ Terminal or 1stPayPOS and the customer signed for the transaction, you would be able to view the signature in the transaction details.
  • If customer information was entered for the transaction and you need to verify what it was, or if you need to use it elsewhere, you can see the billing information in details as well.
  • Enter your Card Query PIN into the Enter PIN: box at the top of the page to view card number and expiration date.
card-query-pin
 
  • The third column of transaction details indicates whether or not a transaction is recurring or is tied to a recurring transaction. You can use 'Adjust recurring settings' to make a transaction recurring (or change its already existing recurring settings), or if applicable, you can use 'Adjust Original recurring settings' to change the ongoing recurring settings that spawned the transaction.
Note: Just because a transaction comes from recurring billing does not mean that it will be marked as recurring in and of itself! Typically transactions ran after the original transaction will not be marked as recurring, because they are not! Only the original transaction is. Marking a more recent transaction as recurring will set up a new recurring payment and will not check to see if older ones exist!


Option 2: Search for a Recurring Transaction

  1. In the Transaction Center, select Recurring Billing > Search Recurring Transactions
  2. Just like with other searches, you can enter criteria to help narrow down your search OR leave the fields blank
  3. Click Begin Search at the bottom of the page

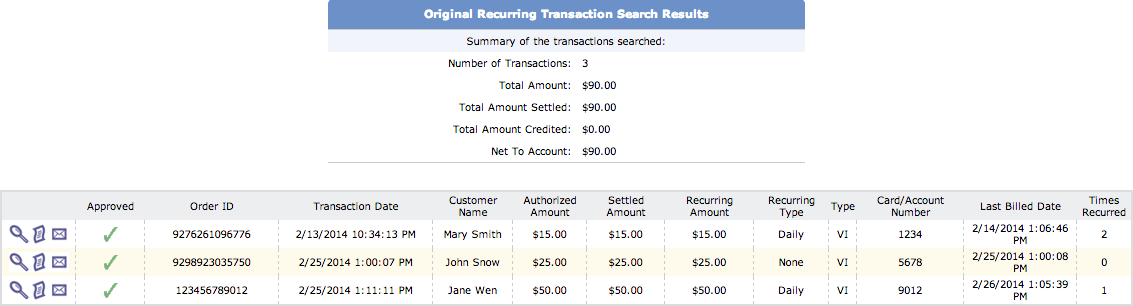
Important note: Recurring search can look for different kinds of transactions. In the middle of the search form, there is a dropdown menu "I would like to"

  • View Original Recurring Transactions
  • View Processed Recurring Transactions
  • Make a Transaction Recurring

If "View Original Recurring Transactions" is set, this pulls up the transactions that were set as recurring. Please keep in mind that for every cycle after the original transaction, a new transaction is created based on recurring settings. So the original recurring transaction is responsible for the recurring settings, but there are individual transactions for every time the transaction recurs.

If "View Processed Recurring Transactions" is set, this pulls up the transactions that ran as a result of a transaction that was set as recurring. These are the transactions that ran for a recurring transaction. They inherit the information from the original recurring transaction, including the date they ran. HOWEVER, as noted before, these transactions are not recurring in and of themselves. They should NOT be set as recurring unless you want to create a new recurring transaction.

If "Make a Transaction Recurring" is set, this pulls up non-recurring transactions, and gives you the option to set them as recurring in the Transaction Detail screen.

view-recurring-transactions

Clicking on the magnifying glass for a recurring transaction in this search will pull up details similar to pulling up details for a regular transaction, except there will also be recurring settings at the bottom of that page.

If a recurring transaction is enabled and you want to disable it, you can simply uncheck "recurring enabled" and click Submit. If a transaction was taken off recurring and you'd like it to be recurring again, you can check "recurring enabled" and click Submit. Read more details about Recurring Billing here.

Note: Make sure that the Start date is either the present day or later, otherwise you will have an unwanted re-run of the transaction because the system will think it missed running the transaction. Similarly, make sure 'Termination Date' is far enough away in the future that it will not affect the transaction from recurring properly.


You can change the CC expiration date, amount to charge every time the transaction recurs, or the customer's information in recurring settings with no risk of 'messing up' the transaction. However, if the customer has a new card we HIGHLY recommend that a new transaction is set with the new card number (as opposed to changing the existing transaction). Changing card numbers for an existing transaction can be very risky and cause problems.

Option 3: Search for Transactions in a Batch

  1. In the Transaction Center, go to Virtual Terminal  View Batch Results
  2. This will pull up a search with minimal options (compared to the other searches). If you know the corresponding Batch number or Reference number that the transaction was included in, enter it for the search.
  3. Click Begin Search
  4. Batches meeting search criteria will be displayed. If no search criteria was entered, all batches will be displayed from the last 6 months.
  5. Clicking on the batch number will display the transactions that were in the batch. You can see information about the transactions or click on the magnifying glass icon to see details just like with any other search.
Contact Us