AUTHORIZE.NET EMULATOR
The Authorize.Net Emulator allows iATS clients to use a variety of third party web-based software providers such as shopping carts, ticketing sites and other web technology tools that have currently integrated the Authorize.net payment gateway.
There are many different web-based software providers that currently use the Authorize.Net payment gateway which iATS has emulated, including Ultracart, Webconnex and WooThemes.
Learn more about how to use the Authorize.net Gateway Emulator with your iATS merchant account.
The iATS Payments Authorize.Net Emulator allows iATS Payment clients to utilize a variety of third party web- based software providers such as shopping carts, ticketing sites and other web technology tools that have currently integrated the Authorize.net Gateway. Our Emulator service is available on both our North American and UK server regions.
There are many different web-based software providers that currently utilize the Authorize.Net Gateway which iATS has emulated, one of which is Webconnex.
Webconnex offers five tools which our clients can use to connect to their iATS Payments Client Code:
The following instructions detail how to connect an iATS Merchant Account to a Webconnex tool. For non- Webconnex tools, please the General Information on Integration with Other Providers section below.
Note: We strongly recommend that your online payment form is configured to require the CVV security code for Credit Card transactions. This requirement helps to prevent fraudulent transactions.
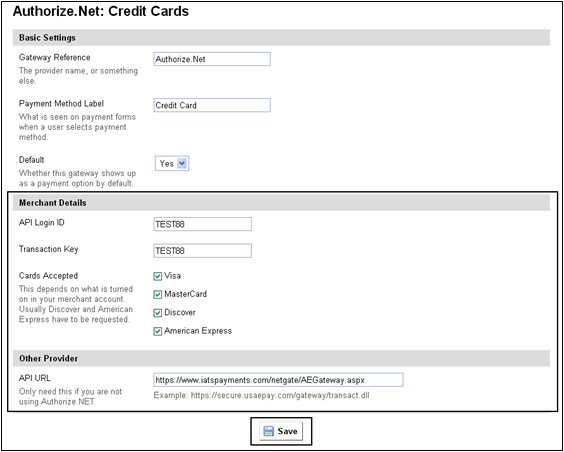
| 1. | Obtain your iATS Payments Online Client Sub-Code (6-Digits) and Password information. |
| 2. | Login to your Webconnex account at http://www.webconnex.com/ |
| 3. | Click Gateways Icon. |


| 4. | Select Authorize.Net as the credit card processor. |
| 5. |
Complete the Authorize.Net Credit Cards setup page: a. Enter your 6-Digit iATS Online Client Sub-Code in the API Login ID field. b. Enter the Password in the Transaction Key field. c. Select Visa, MC, Discover and American Express. Note: Your iATS Payments Merchant Account is automatically set-up with all four card types unless otherwise requested. d. Add the iATS Payments Emulator URL listed below into the API URL field: North American: https://www.iatspayments.com/netgate/AEGateway.aspx UK: https://www.uk.iatspayments.com/netgate/AEGateway.aspx e. Click Save. |
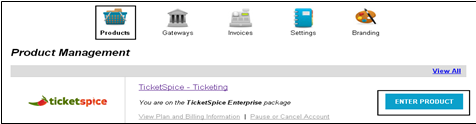
| 6. | Access the Webconnex tool which will be utilized, for example Ticketspice by clicking on Products. |
| 7. | Click on the Campaign (or create a new one), and click on Layout. |
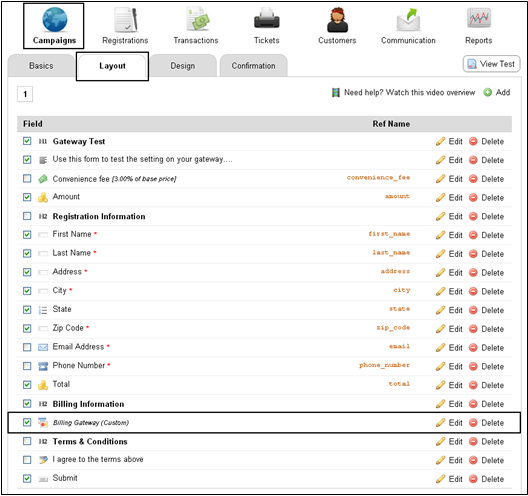
| 8. | Under Billing Gateway click Edit. |
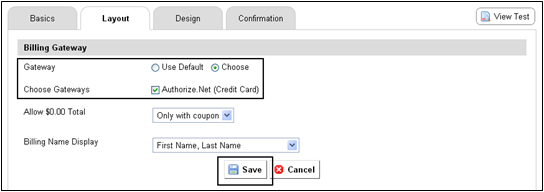
| 9. | ON the Layout tab, select Choose for the Gateway, and check Authorize.net (Credit Card). |
| 10. | Click Save. |
| 11. | Please Note: When processing test transactions, please use the Live Version and not the Test Mode. |
The iATS Payments Authorize.Net Emulator allows iATS Payments clients to use the Authorize.Net payment module that has been integrated within many third party shopping carts and software providers.
In most provider instances, there is an API Log In field and a Transaction Key field to enter the iATS Online Client Code and Password, and a text field for the Post To URL.
The following steps and examples can be utilized for general integration:
| 1. | Locate the Authorize.Net Aim Payment Module and change the ‘POST TO’ URL: |
| 2. | Enter your 6-Digit iATS Client Online Sub-Code in the API Login ID field. |
| 3. | Enter the Password in the Transaction Key field. |
| 4. | Change the ‘POST TO’ URL within the Authorize.Net payment module to https://www.iatspayments.com/netgate/AEGateway.aspx (the iATS Payments gateway). |
It is important to note that some providers do not utilize a text field for the URL, and instead list the Authorize.Net Gateway in a pick list drop down menu instead.
In these instances the iATS Payments Emulator will not work, unless the company chooses to add iATS to the pick list.
The examples provided here are for several popular third party shopping carts that are integrated with Authorize.Net. The instructions below will show how quickly and easily you can set up the Authorize.Net Emulator to work with your third party shopping cart.
Magento – Online solution
OpenCart – Software
ShopSite – Software
VirtueMart – Software
WordPress + Shopp – Software
Zen Cart – Software

.png?width=200&height=150&name=iATS%20by%20Deluxe_200x150%20(1).png "iATS by Deluxe_200x150 (1)")